For this tutorial, I’m going to assume that you just spun up a fresh install of Windows and you don’t have your standard cache of programming software already installed. On top of that, for some reason, none of the bookmarks you generally use are working and your memory regarding software on the internet is completely gone.
-OR-
Like me, you just need a step-by-step guide to getting up and running. This will be written for a computer savy individual who may or may not be a programmer or even familiar with these applications.
First things first, Microsoft has made a pretty cool move in the last year or so and made available for free the (In My Humble Opinion) best C++ IDE.
Visual Studio can be downloaded here or just google it.
Click the purple link “Download Community Free”.
One that’s done downloading, go ahead and run it.
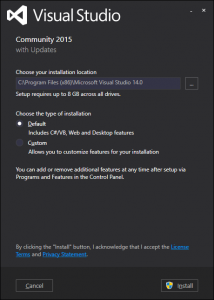
The most important part of the installation of VS2015 is that the forgot to include c++ as one of the default languages when the build the installer so if you use all the defaults, you don’t get it.
When you get to this screen:
Select “Custom” and hit “Next”.
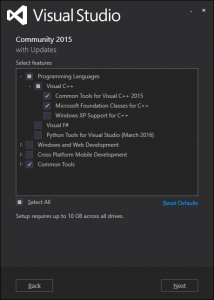
Everyone’s different but here’s what I selected:
I intend to use GitHub to host and share this project and if you want to keep changes to your project straight, I do would definitely recommend you do so as well.
Again, hit “Next”, and then “Install”.
At this point, it downloads and installs the options you’ve selected. The installation should take about as much time as it would take to attempt to break a world record. Here’s a link to get you started.
Once you’ve done that, come back and we’ll move on to the next piece. Ok, it’s not that bad but it does take over an hour.
Lukily we can continue onto the next step before the installation completes: Downloading the library.
“But Max…”, you might be saying. “Shouldn’t be building from source?”. To that I say… The code is here. See you in a bit.
libtcod was originally created as “the function library built for the Chronicles of Doryen.”
The downloads page can be found here. I grabbed a version labeled Windows/Visual Studio 2010 C/C++/python. Which we may need to adapt to Visual Studio 2015 but that should be too hard.
The base path for my project will be the folder C:\Projects, I recommend you do that same if you want the copy/pasting to work.
Extract your download to the folder C:\Projects\libtcod-1.5.1. I’ve kept the version number in the folder name because I may want to check out a different version of the library simultaneously.
At this point. Let’s flash forward in time and assume your installation of Visual Studio is finished. Let’s fire it up and get a new project going.
Wait… first we have to talk about the account that needs created in order to access all your developer services. Don’t.
Look for a tiny link to skip past it.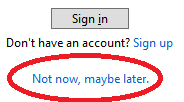
The next thing it will ask for is your color theme. I picked Blue (the default). Again, to each his own.
The next step takes another longish while that just says “We’re preparing” for some such nonsense. Once it’s done, Let’s jump right in.
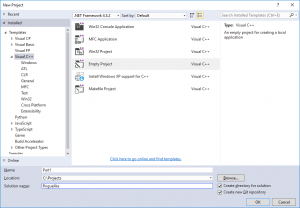
Make a new blank project by going to File -> New -> Project.
Here are the settings I used to create an empty blank project:
Let’s add our first file “main.cpp” by right-clicking on “Source Files in the Solution Explorer and selecting add -> new item.
Rename it to main.cpp
Copy the following text into the new window.
1 2 3 4 5 | int main(void) { return 0; } |
Run the code (F5 key) to be sure everything up to this point works.
if you get the following message; For God’s Sake click “Do not show this dialog again” before clicking Yes. It should take a few seconds to compile and link before it pops up a little window which will immediately close.
This is good.
Now let’s bring in the library.
In Solution explorer, right-click the project (In my case, Part1) and select properties.
Under Configuration Properties -> VC++ Directories append your library directory (C:\Projects\libtcod-1.5.1) to the following sections:
- Include Directories: add the “include” folder
- Library Directories: add the “lib” folder
- Source Directories: add the “src” folder
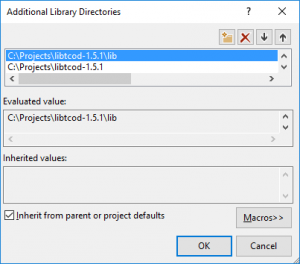
Still under Configuration Properties, select Linker -> General and add the “lib” and the root folder of the library to Additional Library Directories. Then click OK.
Also under Linker, select Input, and add “libtcod-VS.lib” to the Additional Dependencies row.
This is all that is necessary to compile and link the code. However, because the library is a dynamic library, it also needs to live in the same folder as the executable.
Copy the following files from the library folder into your Debug path (C:\Projects\Roguelike\Debug):
- libtcod-VS.dll
- SDL.dll
- zlib1.dll
- terminal.png
Additionally, the software requires the default font in the same location as the source files. So move the same “terminal.png” file to C:\Projects\Roguelike\Part1.
1 2 3 4 5 6 7 8 9 10 11 | #include "libtcod.hpp" int main(void) { TCODConsole::initRoot(80,50, "VS2015 and libtcod tutorial"); TCODConsole::root->printEx(40, 25, TCOD_BKGND_NONE, TCOD_CENTER, "Hello world"); TCODConsole::flush(); TCODConsole::waitForKeypress(true); return 0; } |
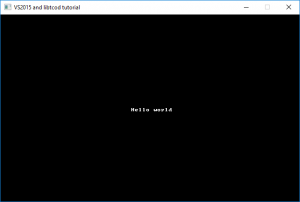
Running the new code (F5) should show you a screen like the following:
If you don’t get that screen, I’d go back to where you added the library. Ensure you follow EVERY step correctly. Also check that you moved 4 files into the debug folder and the terminal.png to the source code folder.
That’s all for now, I’m going to go and make myself a game.
I’ll be following this tutorial starting on Step 5 with the First Program. I recommend you do the same.
Thanks for reading, feel free to comment, and let me know if you have any issues.

